Robin Charlton’s TR6 in Lockdown
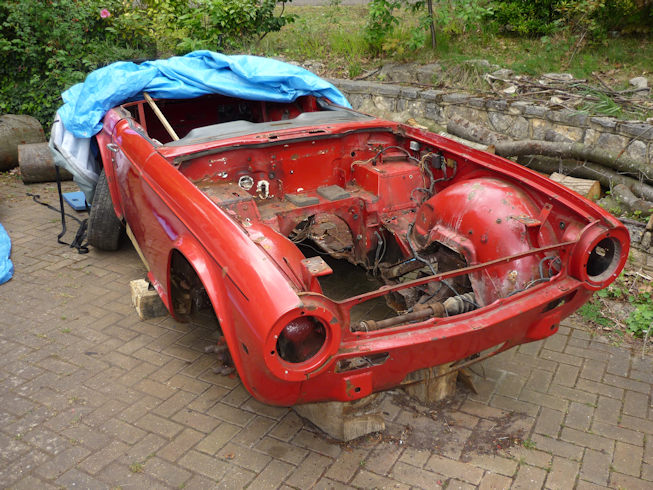
I bought my basket-case TR6 a few years ago and have been slowly working my way through a restoration. Generally this has been running gear and mechanicals during the winter months and bodywork when the weather is fine. The car was “restored” in the early 1980s, but in reality this was a simple of plating over any rust holes, followed by a respray. The car then sat outside exposed for around 30 years during which time the rust returned between the doubled-up metal to leave something of a mess
First body work was replacement of the diff-floor, heel board, driver’s side (RHS) floor and sills; followed by reconstruction of the RHS front wheel-arch… but that is before lockdown, so not covered in this posting
Welcome to my Workshop
RHS Wheel arch and Inner wing. The RHS bulkhead and bulkhead-end panels had been prepared prior to lockdown, as had the conversion of a NOS CR type RHS wheel-arch to the earlier CP type, as fitted to my car. I had also made a new RHS top panel (clutch master cylinder and pedal box attachment), but I have not included a description of these repairs as they were before lockdown.


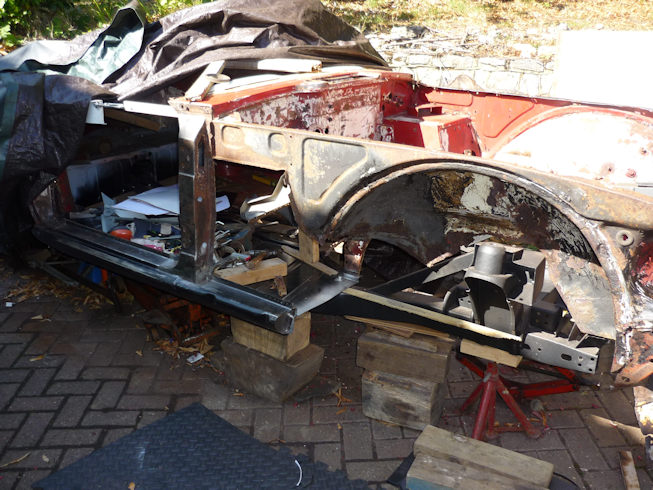
LHS Wheel Arch. This item was sound in the main part, although with various holes for non-original fittings, but was rusted around all edges. Repair turned into something of a marathon as I estimate that the periphery of a TR wheel arch is around 2.5m. What I found interesting is how, in places, the rust had burrowed below the paint over quite long distances. I can see why people talk about metal being attacked by the “tin worm”


LHS Inner Wing. I think that most TR6 restorers will know that that Heritage inner wings are not available from the various parts stockists and the repro panels need fettling to fit properly. I found that the 1980s repairers had fitted what looked like a repro panel on the LHS, but what I took to be an original BL panel on the RHS. This meant that I could use the RHS panel as template when tackling the LHS inner wing (which, as fitted, included some ugly bodged cut-and-shut jointing). Comparison of the two sides and wheel arches suggested where to cut and rejoin the LHS panel, which included replacing a number of out-of-position wing mounting holes. Other work involved repairing rust holes, rebuilding the bonnet-buffer mounting bracket and replacing thinned metal on the wing extension plate (I don’t know if this part has a correct name… can’t see it listed separately in the Moss catalogue)


Before the LHS inner wing wheel arch were welded into place I had to take on a crumbly bulkhead and plenum chamber. A number of new patch-panels had to be fabricated and welded in to replace the very frilly original parts. I am not sure what, if any, corrosion protection would have been applied at the factory, but it gave me the opportunity to add the first new surface paint of the restoration, (other than weld-trough primer), even if it was just a quick spray of red Hammerite


Having completed the bulkhead and inner wing repairs, and welded these items into place I was then able to move on to the LHS floor and sills. I had to remove the LHS bulkhead end-panel for this next step and had planned to repair this original part, but found it to be in very poor condition having suffered from the 1980s bodges as well as rust over the years. The available new bulkhead end-panels are Heritage panels, which are more-or-less identical to the original parts, so I decided that this would save time and also ensure that I had the correct geometry for the floor, sills and A-Post. The floor and sills look more imposing pieces than the inner wings etc, but generally I found fitting them easier and quicker to install, largely due to the floor and inner sill also being Heritage panels which have a good fit. The outer sill is not available as a Heritage item and the repro panel leaves something to be desired, (compared to a ONS BL part which I am reserving for my TR4A – one day !). However, it did go in reasonably well after the judicious use of clamps, scissor jacks and the best sill end-caps that I could find. Plus lots of measuring and checking!


Having a rotten bottom to the LHS A-Post made it easier to slip in the floor and adjust the inner and outer sills, but once these were in their final position (lots of nervous measuring), I was then able to get on with repairs to the A-Post. Front corner is a simple angled bend, but making the sweep for the door opening took a little longer. The inner base was not difficult as it was easy to cut a ply-wood form for the shrinking/stretch where the A-Post sits on top for the inner sill. Remnants of the old post showed a joggle to allow fitting over the sill flange, so that was included in the patch. The weld areas on these patches will require a skim of body-filler before paint, but I will probably wait until setting panel gaps… just in case.


I am working my way around the car in an anti-clockwise direction, but before giving my attention to the B-Posts, rear inner wings, rear valance etc., I will return to the front. This will be for a replacement battery tray, next up to add some strength to the bulkhead etc., plus repairs to the front valance (now the replaced inner wings and wheel arches can provide some reference points).
Work and pictures as and when!
What a brilliant story and thanks for sharing it with all of us. You certainly know how to work sheet metal – excellent work. Thanks, Mike Heelis
Hello, can I ask where you manage to locate a replacement front rh inner wheel arch with the partial leadge? Thanks